
| Author | : | A J Marston |
| Date Created | : | September, 1984 |
| Date Revised | : | February, 1993 |
| Version | : | 01.006.000 |
Nowadays it is common practice to use a particular method of Structured Design before producing the code that will fulfil a particular function. No matter what Design Methodology is used, the whole object of using structured programming techniques is lost if the actual code produced is badly written. Not only must the code fulfil its desired function, and perform it efficiently, it must also be maintainable by all those programmers who follow in your wake. In the life of any program more time is spent on maintenance and enhancement than was ever spent on the original implementation.
COBOL is a flexible, free-format language that has very few internal constraints. It does not enforce any particular structural method, instead it allows the individual to adopt whatever structure their particular level of mentality can imagine.
The author of this document has over a decade's worth of experience in writing COBOL programs, and has encountered many different standards, each with its own set of strong as well as weak points. Some are too rigid and unnecessarily restrictive, while others are too flexible and open to misinterpretation. Those which do not encourage or promote efficient, readable and maintainable code have been discarded, and the remainder have been reviewed and modified in the light of experience, common sense and logic.
In those installations where programmers are allowed to adopt whatever style takes their fancy it is sometimes necessary to be familiar with an individual's style before it is possible to work on one of their programs. If a program has been worked on by several different programmers the mixture in styles can sometimes be very confusing. However, in those installations where proper standards and a common style of coding have been adopted it should be possible for any programmer to work on any program without knowing the identity of the previous authors.
This is known as "ego-less programming", and is something which this document is intended to encourage and promote. These standards are meant to show how code can be written in such a way as to be more readable, easier to understand and therefore more maintainable. A well-written program should read like a piece of prose, not a bunch of gobbledygook.
I am a great believer in having my source code liberally sprinkled with documentation in the form of comment lines (those with an asterisk in column seven). Any program which does not contain comments is immediately suspect - it may actually work, but how easy is it to maintain or modify? There may be separate written documentation, but there are distinct advantages in producing self-documenting code:
How can self-documenting code be produced?
It helps if all comments are in lower-case, to differentiate from actual commands which should always be in upper-case. Leave only one space between the asterisk in column seven and the start of the comment - more spaces are laborious to enter in the first place, and certainly don't make the comments easier to read.
There is one acid test to prove that your program is adequately documented - can you reconstruct all the written documentation from your source code? If the answer is NO, then you have failed. There are some products available nowadays which will do the job for you - they read your source code and produce all the separate documentation that you require. It should be obvious, therefore, that products such as these cannot extract information which is not there to begin with.
The IDENTIFICATION DIVISION of any COBOL program must contain at least the program name. This is also the best place in which to record other useful information which will serve as an introduction to the program as a whole. Such `useful information' can be summarised as follows:
Items (a) (b) (c) and (d) can be specified using the standard COBOL Identification Division statements. The remainder should be included as comment lines.
Even though all of the above information can be obtained by close examination of the code, it saves a lot of time (and time is money!) by having it laid out at the start of each program listing.
The DATA DIVISION of any program is a mixture of individual record names subdivided into numerous item names, which in turn can be subdivided into various sub-items.
Items which are not subdivided are known as elementary items. Items which are subdivided are known as group items, with the record name being equivalent to the highest level of group item.
In COBOL all data items are defined in the following manner:
<level-number> <data-name> <picture clause>
where
<level-number> |
is a two-digit number which starts at 01 for record names and ascends up to 49 for all data items which are to be considered part of that record definition. |
<data-name> |
is the name by which that particular data area can be referenced from within the program. |
<picture clause> |
describes the format of that particular data-name (alphabetic, numeric, etc.). |
The picture clause is required only for elementary items - record names and group items assume a picture of PIC X(n) where `n' is the combined length of all the subordinate items within that group definition.
It is therefore possible to construct a record definition as follows:
01 RECORD-NAME.
02 DATA-NAME-1-ALPHA PIC X(2).
02 DATA-NAME-2.
03 DATA-NAME-3-NUMERIC PIC 99.
03 DATA-NAME-4.
04 DATA-NAME-5-ALPHA PIC X(2).
04 DATA-NAME-6-NUMERIC PIC 9(5).
02 DATA-NAME-7-ALPHA PIC X(6).
This layout, however, is totally unacceptable in a structured program because it is not easy to determine which elementary items go with which group items. It would be easier to read if some sort of indentation was used to differentiate between the various level numbers, and if there was some space between the data name and the picture clause.
This example shows the effect of indenting the data names but not the level numbers:-
01  RECORD-NAME.
05      DATA-NAME-1-ALPHA                 PIC X(2).
05      DATA-NAME-2.
10          DATA-NAME-3-NUMERIC           PIC 99.
10          DATA-NAME-4.
15              DATA-NAME-5-ALPHA         PIC X(2).
15              DATA-NAME-6-NUMERIC       PIC 9(5).
05      DATA-NAME-7-ALPHA                 PIC X(6).
This example shows the effect of indenting the level numbers, but not the data names:-
01  RECORD-NAME.
  05           DATA-NAME-1-ALPHA          PIC X(2).
  05           DATA-NAME-2.
      10       DATA-NAME-3-NUMERIC        PIC 99.
      10       DATA-NAME-4.
           15  DATA-NAME-5-ALPHA          PIC X(2).
           15  DATA-NAME-6-NUMERIC        PIC 9(5).
  05           DATA-NAME-7-ALPHA          PIC X(6).
The following example is the best because it indents both the level number and its associated dataname. Note that each different level number is aligned in a separate column, making it easier to spot any mistakes.
01  RECORD-NAME.
    05  DATA-NAME-1-ALPHA                 PIC X(2).
    05  DATA-NAME-2.
        10  DATA-NAME-3-NUMERIC           PIC 99.
        10  DATA-NAME-4.
            15  DATA-NAME-5-ALPHA         PIC X(2).
            15  DATA-NAME-6-NUMERIC       PIC 9(5).
    05  DATA-NAME-7-ALPHA                 PIC X(6).
Note that all the picture clauses are aligned in the same place, usually at column 40. Where a data name flows into this column the most common practice is to put the picture clause on the following line, thus keeping the alignment consistent, eg:
    05  DATA-NAME-2.
      10  DATA-NAME-2A.
          15  THIS-IS-ANOTHER-LONG-DATANAME
                                          PIC X(2).
          15  THIS-IS-YET-ANOTHER-LONG-DATANAME
                                          PIC 9(5).
The guidelines for record layouts can be summarised as follows:-
The effect of items (c) and (d) is that the data names for one level are aligned in the same column as the level numbers for the next level. This may seem irrelevant, but I think that it looks better. When using the QEDIT text editor in full-screen mode it is possible to define the tab stops at columns 8,12,16,20,24,28 etc, therefore the same tab settings can be used for both level numbers and data names.
Now for some advice on how to describe headings for batch reports. Here are three ways of describing the same print line:
Example 1:
01  HEADING                     PIC X(132) VALUE
    "ITEM      DESCRIPTION                   QUANTITY  UNIT PRIC
-   "E  TOTAL PRICE VAT".
Example 2:
01  HEADING.
    05  FILLER                    PIC X(4) VALUE
                                  "ITEM".
    05  FILLER                    PIC X(6) VALUE
                                  SPACES.
    05  FILLER                    PIC X(11) VALUE
                                  "DESCRIPTION".
    05  FILLER                    PIC X(19) VALUE
                                  SPACES.
    05  FILLER                    PIC X(8) VALUE
                                  "QUANTITY".
    05  FILLER                    PIC X(2) VALUE
                                  SPACES.
    05  FILLER                    PIC X(10) VALUE
                                  "UNIT PRICE".
    05  FILLER                    PIC X(2) VALUE
                                  SPACES.
    05  FILLER                    PIC X(11) VALUE
                                  "TOTAL PRICE".
    05  FILLER                    PIC X(1) VALUE
                                  SPACE.
    05  FILLER                    PIC X(3) VALUE
                                  "VAT".
Example 3:
01  HEADING.
    05  FILLER                   PIC X(10) VALUE "ITEM".
    05  FILLER                   PIC X(30) VALUE "DESCRIPTION".
    05  FILLER                   PIC X(10) VALUE "QUANTITY".
    05  FILLER                   PIC X(12) VALUE "UNIT PRICE".
    05  FILLER                   PIC X(12) VALUE "TOTAL PRICE".
    05  FILLER                   PIC X(03) VALUE "VAT".
Of these three examples you should see that the third is more `readable' and therefore easier to maintain.
Even though COBOL allows the same data-name to be used more than once in different record definitions (each occurrence can be uniquely addressed by the construct <data-name> OF <record-name>) it is common practice to make each occurrence unique by adding a record mnemonic as either a prefix or a suffix. Each record definition should be allocated its own mnemonic which should then be attached to all data items within that record.
Please refer to the section on Naming Standards in the manual on Project Development Standards for more details on how to assign prefix values for IMAGE datasets and VPLUS screen buffers.
If a suffix is used it produces code which looks like the following:-
01  ACCOUNT-RECORD.
    05  ACCOUNT-TYPE-ACC                  PIC X(2).
    05  ACCOUNT-NUMBER-ACC.
        10  GROUP-ACC                     PIC 99.
        10  CLASSIFICATION-ACC.
            15  CLASS-CODE-ACC            PIC X(2).
            15  CLASS-NUMBER-ACC          PIC 9(5).
    05  CLIENT-NAME-ACC                   PIC X(6).
However, I think a prefix produces better code, as follows:-
01  ACCOUNT-RECORD.
    05  ACC-ACCOUNT-TYPE                  PIC X(2).
    05  ACC-ACCOUNT-NUMBER.
        10  ACC-GROUP                     PIC 99.
        10  ACC-CLASSIFICATION.
            15  ACC-CLASS-CODE            PIC X(2).
            15  ACC-CLASS-NUMBER          PIC 9(5).
    05  ACC-CLIENT-NAME                   PIC X(6).
In the procedure division this would produce code similar to this:-
    MOVE ACC-ACCOUNT-TYPE             TO PRT-ACCOUNT-TYPE.
    MOVE ACC-ACCOUNT-NUMBER           TO PRT-ACCOUNT-NUMBER.
    MOVE ACC-GROUP                    TO PRT-GROUP.
    MOVE ACC-<etc>                    TO PRT-<etc>
The use of a prefix also makes it easier to search through your source code (with your particular text editor) to list all those places in a program where a record is referenced:
LIST "ACC-"
LIST "MOVE ACC-"
LIST "TO ACC-"
COBOL allows data names to be up to 30 characters in length. However, most programs which run on the HP3000 tend to have some sort of access to either IMAGE databases or VPLUS screens, where the length of data items is limited to 16 and 15 characters respectively.
Item names should convey some sort of description as to their content, and in order not to exceed this 15-character limit it is sometimes necessary to use abbreviated terms. Whatever abbreviation is chosen it is important that the same one is used throughout the system. For example, the following combination of item names within the same system is very sloppy:-
LINE-NUMBER
ACCOUNT-NBR
INVOICE-NUM
DOC-NO
Where the same item appears in more than one place within the system (eg: in an IMAGE dataset, or a VPLUS screen) it is a very good idea to keep to the same spelling.
Where the item is subsequently defined within a program's data division (eg: in the dataset buffer, the screen buffer, or a print buffer) it is also a very good idea to keep to the same spelling. The only difference should be in the prefix, which acts as an identifier for the particular buffer.
The only exception to this guideline is where an item occurs more than once on a VPLUS screen. As the OCCURS clause does not exist within FORMSPEC it is necessary to give each occurrence of the item a unique name. This is done by appending a 2 digit sequence number (starting at "01") to each occurrence of that item name. This suffix can be dropped within the COBOL definition as the OCCURS clause can be used instead. There should then be a direct relationship between the hard-coded number in the forms file and the occurrence number within the COBOL array, as demonstrated in the following example:
VPLUS:      ITEM-NAME01,ITEM-NAME02,,,,,,,ITEM-NAME09,ITEM-NAME10

COBOL:      ITEM-NAME PIC X(?) OCCURS 10.
If it becomes necessary within your program to identify one of these field names (eg: to pass to the SCVSETERROR routine after a failure in some validation) it can be constructed as ITEM-NAMEnn where nn is the occurrence number.
Data definitions within a program's WORKING-STORAGE section can be a mixture of dataset buffers, screen buffers, and general work areas.
Each item name should be prefixed by a different mnemonic depending on the record definition in which it appears. IMAGE dataset buffers and VPLUS screen buffers should have been allocated their own unique mnemonics, but what of the general work areas?
Some standards say that all WORKING-STORAGE definitions must be prefixed with the letter `W', but in very large sections it can be a long-winded process to find an individual definition.
Other standards say that the prefix should be two characters in order to denote the general usage, as in the following:
WA- accumulators
WC- constants
WI- indicators/flags/switches
WM- modifiers/subscripts
WT- tables/arrays
However, I much prefer to see groupings of items which are related logically, rather than functionally, as in the following:
01    T01-COMPONENT-TABLE.
  05  T01-MAX                    PIC 99 VALUE 20.   <constant>
  05  T01-CURR                   PIC S9(4) COMP.    <subscript>
  05  T01-LAST                   PIC S9(4) COMP.    <subscript>
  05  T01-TABLE-ENTRY            OCCURS 20.
      10  T01-CODE               PIC X(6).
      10  T01-DESCRIPTION        PIC X(30).
      10  T01-VALUE              PIC S9(7)V99 COMP.
  05  T01-TOTAL-VALUE            PIC S9(7)V99 COMP. <accumulator>
Even though each item has a different function, they are all logically related, as they are concerned with that particular table and no other. It also makes it easier to search through the source code to find any reference to this data area simply by specifying a search string of "T01".
The following definition is also acceptable, but it has a distinct advantage when using the COBOL'85 compiler, which allows a group of data items to be reset to blanks or spaces with a single statement.
01  T01-MAX                      PIC S9(4) COMP VALUE 20.

01  T01-COMPONENT-TABLE.
    05  T01-CURR                 PIC S9(4) COMP.
    05  T01-LAST                 PIC S9(4) COMP.
    05  T01-TABLE-ENTRY          OCCURS 20.
        10  T01-CODE             PIC X(6).
        10  T01-DESCRIPTION      PIC X(30).
        10  T01-VALUE            PIC S9(7)V99 COMP.
    05  T01-TOTAL-VALUE          PIC S9(7)V99 COMP.
Although the item T01-MAX has been taken out of the original layout and changed from an 05 level to an 01 level it has still retained the T01- prefix to show that it is still related logically. Thus the statement INITIALIZE T01-COMPONENT-TABLE will correctly reset to zeros/spaces the values of all T01- items except for T01-MAX, which must remain at 20.
As a general rule, then, the WORKING-STORAGE section should be laid out in logical groups with prefixes as follows:
Tnn- tables/arrays
Wnn- other
These should be defined in their proper sequence so that it is easy to locate any individual data item when searching through a program listing. Any copy library members for dataset/file buffers should be correctly sequenced by their respective prefix values. This avoids the need to produce a cross-reference listing which incurs a considerable overhead, both in compilation time and printing time.
Some people like to define global subscripts/indices in the form SUB1, SUB2....SUBn (or INDX1, INDX2,,,INDXn). This is bad practice because there is no logical relationship with any particular table/array, and the names do not convey any sort of meaning.
It can take a long time to debug a program if the same subscript is accidentally used to reference two different tables at the same time, or two different subscripts are accidentally used to reference the same table at the same time.
This is not a problem if the name of the subscript/index item is constructed in the format <prefix>-<usage> where:-
<prefix> | indicates the table to which it has been associated, |
<usage> | indicates how this particular item is used. |
As can be seen in the previous section the subscript item used to access T01-TABLE-ENTRY is named T01-CURR. This cannot easily be confused with T01-MAX, which is used to indicate the maximum number of entries the table may contain, and T01-LAST which indicates the actual number of entries in the table at present.
Condition names are used to show an expected range of values for a particular data item. Once a condition-name has been defined, that particular name can be used instead of testing the data item for a specific value (or range of values). Take the following definition in a program's working-storage section:
05  IMAGE-STATUS              PIC S9(4) COMP.
 88 IMAGE-OK                  VALUE ZERO.
 88 IMAGE-ERROR                   VALUE -9999 THRU -1,
                                        +1 THRU +9999.
 88 IMAGE-BEG-OF-FILE             VALUE 10 12.
 88 IMAGE-END-OF-FILE             VALUE 11 13.
 88 IMAGE-BEG-OF-CHAIN            VALUE 14.
 88 IMAGE-END-OF-CHAIN            VALUE 15.
 88 IMAGE-DSET-FULL               VALUE 16.
 88 IMAGE-NO-ENTRY                VALUE 17.
 88 IMAGE-LOCK-FAILURE            VALUE 20 THRU 25
The contents of IMAGE-STATUS can be determined in two ways:
IF IMAGE-STATUS = ZERO | becomes | IF IMAGE-OK |
IF IMAGE-STATUS NOT = ZERO | becomes or | IF NOT IMAGE-OKIF IMAGE-ERROR |
With COBOL'85 it is now possible to set a condition by referring to the name instead of the actual value, eg:
MOVE 0 TO IMAGE-STATUS
is the same as
SET IMAGE-OK TO TRUE
There are only 2 simple guidelines to follow when defining condition-names:
IMAGE-OK, KSAM-OK or VPLUS-OK).As a general rule any program that uses its own set of switches or indicators is badly written. Most conditions can be handled by data areas that have already been defined (eg: the status areas for VPLUS, IMAGE and KSAM).
If it does become necessary to use a separate indicator then please follow these simple guidelines:-
Here are a few more observations regarding flags and switches:-
VIEW-NUMERRS is already available for this purpose. This has the condition names VEDIT-ERRORS and NO-VEDIT-ERRORS.
IF LINE-COUNT > LINE-MAX (ie: the current page is full)
    MOVE 1 TO NEW-PAGE-REQUIRED.
........
IF NEW-PAGE-REQUIRED = 1
    PERFORM XA-START-NEW-PAGE.
can be replaced by:
IF LINE-COUNT > LINE-MAX
    PERFORM XA-START-NEW-PAGE.
MOVE LOW-VALUES TO ABC-REC.
PERFORM UNTIL ABC-REC = HIGH-VALUES
    READ ABC
        AT END
            MOVE HIGH-VALUES TO ABC-REC
        NOT AT END
            PERFORM CA-PROCESS-ABC-REC
    END-READ
END-PERFORM.
The PROCEDURE DIVISION in any COBOL program contains one or more SECTIONS. Each SECTION contains one or more PARAGRAPHS; each PARAGRAPH contains one or more SENTENCES; and each SENTENCE contains one or more STATEMENTS.
Control can be passed from one point in a program to another by means of the following statements:
PERFORM <section>.
PERFORM <paragraph>.
PERFORM <paragraph1> THRU <paragraph2>.
GO TO <paragraph>.
These guidelines are extremely flexible, but without additional guidelines the resulting code can be as manageable as a plate of limp spaghetti - please read on for your elucidation and edification.
It is common practice in modern programming to split the code into logical sections or modules. Each section/module performs a particular function, and is invoked by the statement:
PERFORM <section-name>.
Each section/module can, in its turn, invoke other sections to perform lower level functions. This produces a modular hierarchy or structure, hence the term `structured programming'. It is usual to plan the structure of a program at the design stage before writing any code, in order to produce a structure similar to that shown in Figure 1:
Each box represents a separate module, and where two boxes are joined together it indicates that the box at the lower level is PERFORMed by the box at the higher level.
In this particular example it shows that module Q can only be processed by passing control through modules A, D, J, O to Q.
It is possible for any module to be called from more than one higher- level module, and this should be indicated on the chart.
If you have a low-level module which can be called from numerous places (eg: an error routine) it is permissible to leave it out of the chart completely, as it does nothing but complicate the overall picture. Routines such as this are called `transparent'. It should be emphasised that only generalised routines which are common to ALL programs should be regarded as transparent - those which perform a function peculiar to individual programs must appear on the module hierarchy.
Some design methodologies like you to show on this chart how the various modules are invoked, using the terminology SEQUENCE, ITERATION, and SELECTION, denoted by a symbol in the top right-hand corner of each box.
Where the initial design produces a box which is a combination of ITERATION/SEQUENCE or ITERATION/SELECTION most methodologies insist that the structure be preserved by splitting the two and performing the ITERATION part at a lower level.
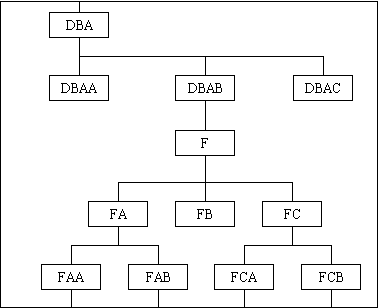
It is common practice to give each module some sort of mnemonic to denote its position in the module hierarchy, both horizontal and vertical. In the example given in section 5.2.1 each module is named from left-to-right and top-to-bottom, but there is no relationship between the mnemonics of modules which have some sort of logical association.
There are two other methods of arriving at mnemonic names, and these are discussed below:
Figure 2 - Module Hierarchy (positional)
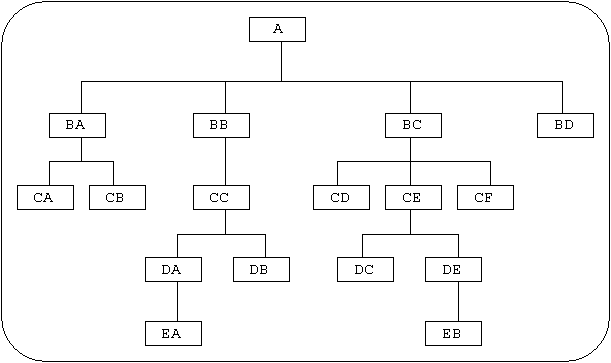
Figure 3 - Module Hierarchy (functional)

Now let us discuss the relative merits of both methods.
It is common sense when coding the procedure division to place the sections in mnemonic sequence - this makes it easier to find your way through the listing. In method (b) this means that each leg within the program structure forms a contiguous block, whereas in method (a) the same sections are spread out all over the place. This is shown more clearly in Figure 4:
Figure 4 - Positional vs. Functional naming
| Positional | Functional | |
|---|---|---|
 |
 |
Using method (b) it is possible to increase or decrease the number of sections in a particular processing leg without having to rename any other sections in order to maintain the naming sequence. See how easy it is in method (b) to split section "DA" into "DAA" and "DAB", then try and make the corresponding change in method (a).
Another advantage of method (b) is that when a program becomes too large for a single unit and needs to be segmented or split into subprograms it is easy to identify which modules are logically related and therefore eligible for separation. Compare those modules marked above in method (b) with the corresponding modules from method (a).
In a large, complex program with many modules method (b) may produce mnemonics which are large and cumbersome - how can this be overcome? Common sense to the rescue - identify a sub-function with a large number of modules and start naming them using a different letter from the alphabet, as shown in Figure 5:
Figure 5 - Restarting the prefix character
For a sorted report which has a large number of control breaks it is acceptable to introduce a number into the mnemonic, and to increment this number for each lower level instead of increasing the length of the mnemonic by adding another character. This would produce a structure chart something like the one in Figure 6:
Figure 6 - Numerical Sequencing
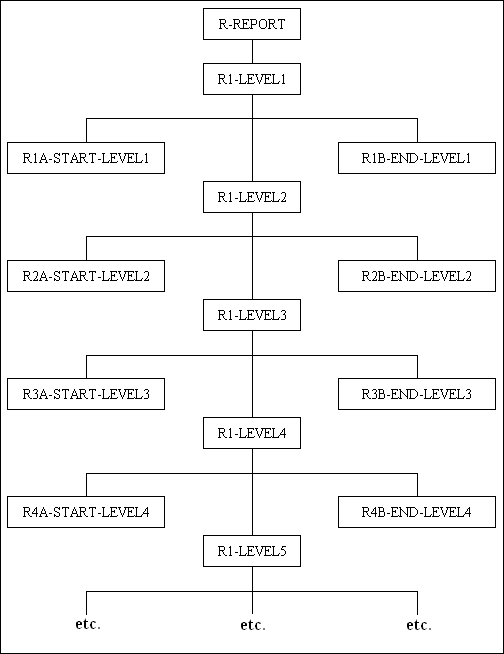
With this method all the processing for a particular sort level would be held in contiguous sections as the sequence would be as follows:-
R, R1, R1A, R1B, R2, R2A, R2B, R3, R3A, R3B, R4, R4A, R4B, R5
Some standards have a rule that if a section has more than one parent (ie: can be called from more than one section at a higher level) then it should be allocated a prefix which represents a general-purpose routine, usually at the bottom end of the alphabet (eg: X, Y or Z). This is fine if it is a small section with limited processing, but what if it is just the start of a significant piece of coding?
Take the following example - A database is comprised of customers who are grouped into countries, which in turn are grouped into regions. A program processes the details for customers at the end of each month, but the selection criteria can be one of the following:
This would produce a structure chart something like the one shown in Figure 7:
Figure 7 - A Module with multiple parents
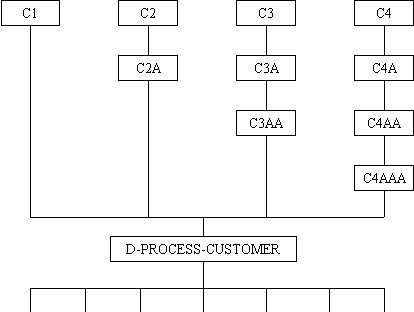
Notice that the selection processing is handled by modules which have the "C" prefix, while the actual customer processing (regardless of the selection method) has a separate prefix. This makes tracing your way through the source code a lot easier, which is more important than conforming to inflexible rules with their artificial restraints.
The guidelines for sections can be summarised as follows:-
CA-SELECT-COMPONENT, DEA-UPDATE-COMPONENT).PERFORM <section> statement, and not the GO TO <paragraph> statement, nor the PERFORM <para1> THRU <para2> statement.section-name and first paragraph-name there should be a brief comment as to the overall function of that particular section (leave more detailed comments until you get to the actual code). It helps to make this description more distinctive if it is enclosed by a line of asterisks immediately before and after, producing a `box' effect.The guidelines for paragraphs can be summarised as follows:-
BA-10-READ-NEXT, BA-20-UPDATE).BA-99-EXIT or BA-EXIT).GO TO <paragraph-name> statement. Do NOT use the PERFORM <paragraph-name> statement.PERFORM <section-name> statement. Do NOT use the GO TO statement on anything other than a paragraph-name within the current section.The guidelines for sentences and statements can be summarised as follows:-
TO, FROM, BY or GIVING portion of the verb) onto the next line, indenting by four character positions.MOVE ..... TO ..... statements. In this case it makes the code more readable if all the TO portions are aligned under a common column, as in the following example:
MOVE "AA"                     TO ACC-ACCOUNT-TYPE.
MOVE ABC-GROUP                TO ACC-GROUP.
MOVE ABC-CLASSIFICATION       TO ACC-CLASSIFICATION.
MOVE ABC-NAME                 TO ACC-NAME.
guidelines (c) and (d) come in handy when searching a source file for a particular references to a data-name, as with:
LIST "MOVE ABC-GROUP"
LIST "TO ACC-GROUP"
This is not so easy to do if the data-name is split in two, or if more than one space is used between words.
This is where a lot of uneducated programmers come unstuck! Even though COBOL allows the following:
IF <condition> {THEN} <statement-1> ELSE <statement-2> {END-IF}.
There are some basic guidelines which can be applied in order to make the code more readable and easier to maintain. These are:
ELSE, statement-1, statement-2, END-IF) should be on a separate line. This allows for future additions or deletions without having to modify more lines than is necessary.ELSE should be aligned in exactly the same column as the IF to which it is associated. This makes the association more obvious in the listing, especially with multiple or nested IFs.END-IF. Its use should be encouraged as it makes it absolutely clear where each condition is supposed to end, thus avoiding the possibility of confusion and mistakes. Like the ELSE, the END-IF should be aligned in exactly the same column as IF with which it is associated.IF, ELSE and END-IF to be more distinctive in the listing.
This now gives us the following construction:
IF <condition>
    <statement-1>
ELSE
    <statement-2>
END-IF.
Here are some extra guidelines for nested IFs:
IF indent all associated lines by four characters. This gives the following:
IF <condition-1>
    IF <condition-2>
        <statement-1>
    ELSE
        <statement-2>
    END-IF
ELSE
    <statement-3>
END-IF.
IF - they are extremely difficult to debug and maintain.ELSE is paired with the IF that immediately precedes it in the code, not necessarily the one under which it is aligned. Take the following example:
IF <condition-1>
    IF <condition-2>
        <statement-2>
ELSE
    <statement-1>.
According to the indentation <statement-1> is supposed to be executed if <condition-1> is false, but COBOL follows its own rules and executes <statement1> if <condition-1> is true and <condition-2> is false. This type of error is more avoidable if the END-IF is used, as in the following example:
IF <condition-1>
    IF <condition-2>
        <statement-2>
    END-IF
ELSE
    <statement-1>
END-IF.
|
or... |
IF <condition1>
    IF <condition2>
        <statement-2>
    ELSE
        <statement-1>
    END-IF
END-IF.
|
ELSE is immediately followed by an IF without any intervening statements (ie: where only one out of a series of conditions will be TRUE) it is not necessary to indent at each new IF otherwise you will quickly fall off the page. Consider the following example:
IF X-VALUE = 1
    <statememt-1>
ELSE
IF X-VALUE = 2
    <statement-2>
ELSE
IF X-VALUE = 3
    <statement-3>
ELSE
IF X-VALUE = 4
    <statement-4>
ELSE
IF X-VALUE = 5
    <statement-5>
etc.
|
IF X-VALUE = 1
    <statememt-1>
ELSE
    IF X-VALUE = 2
        <statement-2>
    ELSE
        IF X-VALUE = 3
            <statement-3>
        ELSE
            IF X-VALUE = 4
                <statement-4>
            ELSE
                IF X-VALUE = 5
                    <statement-5>
                etc.
|
With the arrival of COBOL'85 this should be written as follows:
EVALUATE X-VALUE
    WHEN 1    <statement-1>
    WHEN 2    <statement-2>
    WHEN 3    <statement-3>
    WHEN 4    <statement-4>
    WHEN 5    <statement-5>
    WHEN OTHER .....
END-EVALUATE.
Here are even more guidelines for complex conditions:
These guidelines should produce something like this:
IF  ((A = 1 OR 2 OR 3)
        AND
     (B NOT = 4))
OR  ((C = "A" OR "Z")
        OR
     (D < E))
    <statement>
ENDIF.
This example, however, is rapidly approaching the stage at which it becomes too unwieldy to be maintainable. Don't be afraid to split a complex condition into its component parts, even if it involves the use of the GO TO statement. Don't try to prove how clever you can be - keep it simple and straightforward.
Even though COBOL allows the PERFORM command to be used on paragraphs as well as sections, its use should be limited to sections only. If necessary make the offending paragraph into a self-contained section, or an in-line PERFORM (if it is small enough). This guideline then avoids the possibility that someone may split the paragraph in two, thereby causing the PERFORM to terminate at the new paragraph name.
Please note that if the word SECTION is missed out on a section name it will be treated as a paragraph. As there is usually nothing but comments between the section name and the next paragraph it means that no code will actually be executed by that PERFORM statement. Unfortunately the code WILL be included in the PERFORM of the preceding section. This usually causes lots of confusion.
Avoid the use of PERFORM <procedure-A> THROUGH <procedure-Z>. It is good practice to name each procedure (section) explicitly - this makes it easier to search a source file for all occurrences of PERFORM <sectionname>, and also avoids the possibility that someone may add a new section between existing sections without realising that it now falls within the bounds of the PERFORM <A> THROUGH <C> statement. A program can produce some very peculiar results if a section is `accidentally' performed out of sequence, and is not easy to debug.
The EXIT verb in COBOL does not produce an EXIT instruction in the object program - it is ignored, but is maintained for documentation purposes only. Whenever a section is PERFORMed COBOL will generate its own (hidden) EXIT instruction when the next section-name is encountered. If a section-name in your source file has the word SECTION missing, COBOL will treat it as a continuation of the preceding section - this can cause some very peculiar results (refer to PERFORM <section>).
Do not use the GO TO verb to transfer control to a point which is outside the current section as any implied EXIT points will be ignored. This means that the program will go where it thinks it should go, which is probably NOT where it is supposed to go.
DO NOT USE THE ALTER STATEMENT! If you need to change the processing sequence due to a certain condition, then use an alternative set of PERFORM or GO TO statements - trying to debug a program where the instruction as it appears in the listing may not be the actual instruction encountered by the program at run time is a very frustrating experience. If it makes the maintenance programmer's job more difficult then DO NOT USE IT!
This may seem to be an economical way of writing source code as this single statement will represent several actual MOVE's. However, in the event of an error caused by an illegal ASCII digit (or similar) the diagnostic trace will not be able to identify which elementary item within the group of items actually generated the fault, which means that it will take longer to identify and solve the problem.
The COMPUTE verb should be used only for complex arithmetic operations, and not for simple additions or subtractions. For example, use ADD 1 TO VALUE instead of COMPUTE VALUE = VALUE + 1 as it is more efficient in machine resources.
The data items within a COMPUTE statement should, if possible, all have the same data type. If there is a mixture of COMP, COMP-3 and DISPLAY fields they will be converted (for the duration of the COMPUTE operation) to a common type before the calculation can take place.
Be aware that the number of decimal places used in evaluating an arithmetic expression is determined by the maximum number of decimal places within the expression. This has implications when doing any divisions, especially when calculating percentages which have an implied division by 100. For example, to apply a rate of 17.25% you have the choice of either:
* 17.25 / 100, or* 0.1725 within the calculation.If none of the items within the calculation has at least 4 decimal places then the intermediate result from (a) above will not be accurate, whereas method (b) avoids this problem by ensuring that the result of the division is stored in a field which has the correct number of decimal places.
It has always been the standard within Hewlett-Packard's block-mode screen processing that the user either presses the ENTER key to process the current screen of data, or presses one of the other function keys to do something else.
The AUTOREAD facility was provided to cater for those special circumstances where it is necessary to capture the current screen contents without the user being able to press the ENTER key - for example, when using the HELP subsystem.
This facility was NOT provided so that the user could bypass the ENTER key altogether, and should not be used as such.
A SORT can be performed in one of the following ways:
SORT .... INPUT PROCEDURE IS .....
          OUTPUT PROCEDURE IS ....
SORT .... USING <file> GIVING <file>
Method (a) may be the fastest, but it requires the most memory as the data requirements of the input, sort and output procedures are all made available at the same time, which can sometimes cause a stack overflow. This construct should therefore be avoided.
Method (b) ensures that the input procedure (used to extract data onto an intermediate file) is completed before the sort is commenced, and that the sort is completed before the output procedure (which processes the sorted file) is commenced. This is slightly slower than method (a), but reduces the risk of a stack overflow.
Method (c) is a further improvement on method (b) insofar as each of the procedures is a separate program. This is useful if either of the input or output procedures is especially complex as the code is kept entirely separate. If an error occurs then any of the later steps can be rerun without having to reprocess all the earlier steps. If different options are required in the output procedure then they should be provided in separate programs rather than additional and optional code within a single program.
Problems can occur with print files if they are not defined correctly within the environment division of a COBOL program. An example of the correct definition is as follows:-
SELECT <internal-name> ASSIGN TO "external-name,,,LP(CCTL)"
The LP(CCTL) suffix causes the file to be created with the default device class of "LP" and with the carriage-control option turned on. Without it the file would be created as a temporary disk file and would not be printed, and would be lost at the end of the job/session. This has been known to cause the client great confusion when he streams a job and the expected print file does not appear. The way out of this predicament is to amend the jobstream(s) to include a file equate which changes the file's characteristics from a temporary disk file to a spool file.
The program should use the WRITE <record> AFTER/BEFORE n/TOP-OF-PAGE statement to add records to the print file which will automatically insert the correct carriage-control instructions. The practice of defining the file as a serial disk file with an extra character at the beginning to contain the hard-coded carriage-control value should be avoided.
If a program requires a parameter value before it can continue with its processing it is normal practice to acquire this from the $STDIN file by means of the ACCEPT <dataname> verb.
Before each ACCEPT statement there should be a corresponding DISPLAY statement in order to identify that some input data is required, and to indicate the format/content that it should take. For example:
DISPLAY "Enter selection date (DDMMYY): " NO ADVANCING.
ACCEPT W01-RUN-DATE.
DISPLAY W01-RUN-DATE.
This should prevent the situation where the program waits for input from the user while the user waits for instructions from the program.
If the program is liable to be run in a jobstream then it would be a good idea to follow the ACCEPT <dataname> with a DISPLAY <dataname>. The $STDLIST output will then show not only what parameter value that was requested, but also the value that was supplied.
These standardised COBOL procedures use the VPLUS communication area which is defined in COMAREA in the standard copy library (STANDARD.LIB.STANDARD).
The macro definitions can be found in the macro file STDMACRO.LIB.STANDARD.
In most situations these procedures replace the need to call all those VPLUS intrinsics individually - all the common calls are grouped together and processed in the correct sequence, as and when required. The only intrinsics not included are VPUTBUFFER and VGETBUFFER, because they require the address of a data buffer which is unique for each different form.
These procedures assume the following programming standards:
The following macros are the most frequently used for VPLUS screen processing. The macros are obtained from file STDMACRO.[NM]LIB, and are documented in the manual entitled Library of Standard COBOL Macros. The subroutines that they call are documented in the manual entitled Library of Standard Utilities.
| %VGETBUFFER(Para#,Buffer#) | Transfers screen buffer to the program's data buffer. |
| %VPUTBUFFER(Para#,Buffer#) | Transfers program's data buffer to the screen buffer. |
| %SAVINITFORM(Para#,Form#) | Loads and initialises a new form. |
| %ACCEPTENTER(Para#) | Displays the current form, window line and function key labels, then waits for the user to press either the ENTER key or one of the labelled function keys. |
| %ACCEPTFUNCTION(Para#) | Similar to %ACCEPTENTER, but will reject the ENTER key. |
| %SCVSETERROR(Para#) | Flags field VIEW-FIELD-NAME in error, using the message in VIEW-WINDOW. |
| %SDVPUTFIELD(Para#) | Updates the value of a single field in the current screen buffer without affecting the data in any of the other fields. |
| %BLINKMSG(Para#) | Displays a message in the window line with the blink option set, and locks the keyboard until the next %ACCEPTENTER or %ACCEPTFUNCTION. |
Each screen should be processed separately, as follows:
 C-SCREEN-MA01 SECTION.
************************************************************
* << description goes here....
************************************************************
 C-10-INIT.

     %SAVINITFORM(C-10#,MA01#).

 C-20-LOAD-BUFFER.

     << There are 2 ways of loading a value into the screen:

     either: %VGETBUFFER(C-20#,MA01-BUFFER#).
             MOVE <value>     TO MA01-<item>.
             %VPUTBUFFER(C-20#,MA01-BUFFER#).

     or:     MOVE <value>     TO VIEW-FIELD-DATA.
             MOVE <item-name> TO VIEW-FIELD-NAME.
             %SDVPUTFIELD(C-20#).

     << If you wish to use function keys f1 to f5 it is necessary
     << to load a value into the corresponding label:

 C-30-ACCEPT.

     MOVE "<label>"           TO VIEW-LABEL(n).
     MOVE "OTHER OPTIONS"     TO VIEW-LABEL(5).

     %ACCEPTENTER(C-30#).

 C-40-KEYS.

     EVALUATE TRUE
         WHEN F0    PERFORM CA-ENTER-KEY
                    IF VEDIT-ERRORS
                        GO TO C-30-ACCEPT
                    END-IF
         WHEN Fn    <process function key n>
         WHEN F5    %USELECT(C-30-ACCEPT#,C-EXIT#)
         WHEN OTHER GO TO C-EXIT
     END-EVALUATE.

 C-EXIT.
     EXIT.
Here is a sample section which is invoked when the user presses the ENTER key. If the data is valid the user must press another key to add this data to the database, or he may change any of the data and have it validated again.
 CA-ENTER-KEY SECTION.
******************************************************************
* ENTER key has been pressed - validate data and process it.
******************************************************************
 CA-10-VALIDATE.

     %VGETBUFFER(CA-10#,MA01-BUFFER#).

     PERFORM CAA-VALIDATE-MA01.
     IF VEDIT-ERRORS
         GO TO CA-EXIT.

 CA-20-CONFIRM.

     MOVE "CANCEL"          TO VIEW-LABEL(4).

* User confirms this data by pressing function key 5
     %CONFIRMDATA(CA-20#,5#,CA-10-VALIDATE#).

     IF NOT F5
         MOVE SPACES        TO VIEW-LABEL(4)
         GO TO CA-EXIT.

 CA-30-PROCESS.

* Processing - please wait
     %BLINKMSG(CA-30#).

     PERFORM CAB-PROCESS-DATA.
     IF IMAGE-LOCK-FAILURE
         GO TO CA-20-CONFIRM
     END-IF.

 CA-EXIT.
     EXIT.
Here is a sample validation section. Notice that processing stops on the first error, otherwise the contents of the window line may not relate to the field where the cursor is positioned.
 CAA-VALIDATE-MA01 SECTION.
 CAA-10-ITEM-1.

    %DBGET7(CAA-10#,BASE#,SET#,ARG#).

    IF IMAGE-NO-ENTRY
        MOVE "<message number>" TO VIEW-WINDOW
        MOVE "<item-name>"      TO VIEW-FIELD-NAME
        %SCVSETERROR(CAA-10#)
        GO TO CAA-EXIT
    END-IF.

    MOVE <database item> TO MA01-<item>.

 CAA-20-ITEM-2.

    << Similar to CAA-10

 CAA-99-PUTBUFFER.

    %VPUTBUFFER(CAA-99#,MA01-BUFFER#).

 CAA-EXIT.
     EXIT.
Because appending forms are not used there may be occasions when a screen contains an array of items which the program has to validate individually. If one of these items is invalid it is important to flag the correct field in error on the screen. Each of these fields has to be identified by its actual field number for use by the VSETERROR intrinsic. However, the standard screen handling routines allow a field to be identified by its name as the VGETFIELDINFO intrinsic is used to convert this into a number.
This allows the following code to be used to validate item arrays:
ITEM01, ITEM02,...,ITEM13 etc.PIC 99.
   IF ITEM(subscript) is invalid
       MOVE "<message number>" TO VIEW-WINDOW
       STRING "ITEM" <subscript> DELIMITED BY SIZE
           INTO VIEW-FIELD-NAME
       %SCVSETERROR(Para#)
       GO TO <exit paragraph>.
CHAR to avoid causing VFIELDEDIT errors on values which cannot be amended.
    01  MA01-BUFFER.
       03  MA01-HDG               PIC X(??).
       03  MA01-ITEM1             PIC X(??).
       03  MA01-VALUE1            PIC Z(5)9.99-.
       03  MA01-VALUE2            PIC Z(4)9.999- BLANK ZERO.
       etc.
    MOVE VALUE1 <PIC S9(7)V99 COMP> TO MA01-VALUE1.
    MOVE VALUE2 <PIC S9(6)V999 COMP> TO MA01-VALUE2.
NUM2 for two decimal places, NUM3 for 3 decimal places, etc. There must also be a FINISH statement to SET the field to itself in order to strip leading zeros, strip commas, adjust for the correct number of decimal places, and to right-justify the value.%UNUMBER2(MA01-VALUE1#,VALUE1#). %UNUMBER2(MA01-VALUE2#,VALUE2#).
Producing batch reports from COBOL programs is not such a tedious task if you follow procedures such as these:
   01  PAGE-COUNT                PIC 9(4) COMP VALUE ZERO.
   01  MAX-LINES                 PIC 9(4) COMP VALUE 60.
   01  LINE-COUNT                PIC 9(4) COMP VALUE 99.
   01  LINE-ADVANCE              PIC 9(4) COMP VALUE ZERO.
   01  LINE-GROUP                PIC 9(4) COMP VALUE ZERO.
   01  PRINT-LINE                PIC X(132).
 ZA-PRINT-LINE SECTION.
**************************************************************
* Standard module to print a line.
**************************************************************
 ZA-10-PAGE-FULL.

* If there is not enough room on the current page for this
* line (or group of lines) then start a new page.
     IF (LINE-COUNT + LINE-ADVANCE + LINE-GROUP) > MAX-LINES
         PERFORM ZAA-PRINT-HEADING.

* Now print the current line.
     WRITE PRINT-REC FROM PRINT-LINE AFTER LINE-ADVANCE.

* Increment LINE-COUNT and reset LINE-GROUP
     ADD LINE-ADVANCE TO LINE-COUNT.
     MOVE ZERO TO LINE-GROUP.

 ZA-EXIT.
     EXIT.
$PAGE
 ZAA-PRINT-HEADING SECTION.
**************************************************************
* Standard module to print page headings.
**************************************************************
 ZAA-10-NEW-PAGE.

     ADD 1                      TO PAGE-COUNT.
     MOVE PAGE-COUNT            TO H1-PAGE-NO.

     IF PAGE-COUNT = 1
* Do not put a blank page at the start of the file
         WRITE PRINT-REC FROM HDG-1 AFTER 0
     ELSE
         WRITE PRINT-REC FROM HDG-1 AFTER TOP-OF-PAGE
     END-IF.

     WRITE PRINT-REC FROM HDG-2 AFTER 1.
     WRITE PRINT-REC FROM HDG-3 AFTER 2.
     WRITE PRINT-REC FROM HDG-4 AFTER 2.

     MOVE 6 TO LINE-COUNT.       < this is the position after HDG-4 >

     MOVE 3 TO LINE-ADVANCE.     < the 1st detail line will always >
                                 < be 3 lines below the headings   >

 ZAA-EXIT.
     EXIT.
LINE-COUNT starts off with a value of 99).PAGE-COUNT is still zero. A separate flag is not required.
     MOVE <detail-line> TO PRINT-LINE.
     PERFORM ZA-PRINT-LINE.
     MOVE 1 TO LINE-ADVANCE.
Note that LINE-ADVANCE is set AFTER the call to module ZA - this is to allow for those cases where the 1st detail line in the current series does not immediately follow the preceding line (a group heading, for example).
     MOVE <group-heading> TO PRINT-LINE.
     MOVE <n1>            TO LINE-ADVANCE.
     PERFORM ZA-PRINT-LINE.
     MOVE <n2>            TO LINE-ADVANCE.
Here is a structured method to process a sorted file which has three levels of data. There is a separate section for each level (or control break). With this structure it is relatively easy to handle any number of control breaks.
 FILE SECTION.
*
 SD  SORT-FILE.

 01  SORT-REC.
     03  SR-LEVEL-1              PIC X(20).
     03  SR-LEVEL-2              PIC X(10).
     03  SR-LEVEL-3              PIC XX.
     03  SR-AMOUNT               PIC S9(7)V99 COMP.
*
 WORKING-STORAGE SECTION.
*
 01  W01-LEVEL-1                 PIC X(20).
 01  W01-LEVEL-1-TOTAL           PIC S9(16)V99 COMP.

 01  W02-LEVEL-2                 PIC X(10).
 01  W02-LEVEL-2-TOTAL           PIC S9(16)V99 COMP.

 01  W03-LEVEL-3                 PIC XX.
 01  W03-LEVEL-3-TOTAL           PIC S9(16)V99 COMP.

 01  W04-REPORT-TOTAL            PIC S9(16)V99 COMP.
Note that in the following sample code the section prefix starts with a single letter rather than a group of 4 or 5 letters. This is because the report procedure is usually a completely separate step (just like the data extract which built the sorted file) and is not really subordinate to any other processing. The subsequent sections expand this prefix with the addition of a level number rather than an ever-increasing set of alphabetic characters. Thus level 4 has a prefix of F4- rather than FABCD-. Any other sections which are performed at a particular level should then follow the normal method of appending alpha characters to the prefix, eg: F2A-, F2B-, etc.
F-REPORT SECTION.
**************************************************************
* Report extracted records in LEVEL1/2/3 sequence.
**************************************************************
 F-10-READ-FIRST.

     RETURN SORT-FILE
         AT END MOVE HIGH-VALUES TO SORT-REC.

 F-20-PROCESS-LEVEL1.

     MOVE ZERO TO W04-REPORT-TOTAL.

     PERFORM F1-REPORT-LEVEL1
         UNTIL SORT-REC = HIGH-VALUES.   << end of file >>

 F-30-REPORT-END.

     << print report totals >>

 F-EXIT.
     EXIT.
$PAGE
 F1-REPORT-LEVEL1 SECTION.
**************************************************************
* Process change of LEVEL-1.
**************************************************************
 F1-10-START-LEVEL1.

* Start each LEVEL-1 on a new page
     MOVE 99                     TO LINE-COUNT.
     PERFORM F1A-LEVEL-1-START.

 F1-20-PROCESS-LEVEL2.

     MOVE ZERO       TO W01-LEVEL-1-TOTAL.
     MOVE SR-LEVEL-1 TO W01-LEVEL-1.

     PERFORM F2-REPORT-LEVEL2
         UNTIL SORT-REC = HIGH-VALUES  << end of file >>
         OR    SR-LEVEL-1 NOT = W01-LEVEL-1.

 F1-30-END-DEPOT.

     PERFORM F1B-LEVEL-1-END.

     ADD W01-LEVEL-1-TOTAL TO W04-REPORT-TOTAL.

 F1-EXIT.
     EXIT.
$PAGE
 F2-REPORT-LEVEL2 SECTION.
**************************************************************
* Process change of LEVEL-2.
**************************************************************
 F2-10-START-LEVEL2.

     << perform processing for start of LEVEL-2 >>

 F2-20-PROCESS-LEVEL3.

     MOVE ZERO       TO W02-LEVEL-2-TOTAL.
     MOVE SR-LEVEL-2 TO W02-LEVEL-2.

     PERFORM F3-REPORT-LEVEL3
         UNTIL SORT-REC = HIGH-VALUES << end of file >>
         OR    SR-LEVEL-1 NOT = W01-LEVEL-1
         OR    SR-LEVEL-2 NOT = W02-LEVEL-2.

 F2-30-END-LEVEL2.

     << perform any processing for end of LEVEL-2 >>

     ADD W02-LEVEL-2-TOTAL TO W01-LEVEL-1-TOTAL.

 F2-EXIT.
     EXIT.
$PAGE
 F3-REPORT-LEVEL3 SECTION.
**************************************************************
* Process change of LEVEL-3.
**************************************************************
 F3-10-START-LEVEL3.

     << perform processing for start of LEVEL-3 >>

 F3-20-PROCESS-LEVEL3.

     MOVE ZERO       TO W03-LEVEL-3-TOTAL.
     MOVE SR-LEVEL-3 TO W03-LEVEL-3.

     PERFORM F4-ACCUMULATE-LEVEL4
         UNTIL SORT-REC = HIGH-VALUES << end of file >>
         OR    SR-LEVEL-1 NOT = W01-LEVEL-1
         OR    SR-LEVEL-2 NOT = W02-LEVEL-2
         OR    SR-LEVEL-3 NOT = W03-LEVEL-3.

 F3-30-END-LEVEL3.

     << perform any processing for end of LEVEL-3 >>

     ADD W03-LEVEL-3-TOTAL TO W02-LEVEL-2-TOTAL.

 F3-EXIT.
     EXIT.
$PAGE
 F4-ACCUMULATE-LEVEL4 SECTION.
**************************************************************
* Accumulate all amounts into W03-LEVEL-3-TOTAL.
**************************************************************
 F4-10-ACCUMULATE.

     ADD SR-AMOUNT TO W03-LEVEL-3-TOTAL.

 F4-20-READ-NEXT.

     RETURN SORT-FILE AT END
         MOVE HIGH-VALUES        TO SORT-REC.

 F4-EXIT.
     EXIT.
It is quite common for some enquiry screens to be constructed using repeating data, eg: to list all invoices for a customer, or to list lines within an invoice. In these cases multiple records are accessed (usually from a detail chain on an IMAGE database), and each record is loaded into one line on the screen. Here are some tips that may prove useful:
Each detail line on the screen will contain several items of data, and it would seem logical to define each data item as a separate field on the screen. However, this could lead to the form containing a very large number of fields, as in the following example:
 DOCNO_01 DATE_01. DESCRIPTION_01................ VALUE_01.... VAT_01.
 DOCNO_02 DATE_02. DESCRIPTION_02................ VALUE_02.... VAT_02.
    "       "            "                            "           "
    "       "            "                            "           "
 DOCNO_10 DATE_10. DESCRIPTION_10................ VALUE_10.... VAT_10.
An easier option would be to define each line as a single field on the screen and have the program split each line down into its component parts, as in the following example:
 LINE_01..............................................................
 LINE_02..............................................................
   "        "            "                            "           "
   "        "            "                            "           "
 LINE_10..............................................................
This cuts down the time used to build and maintain the screen as the 10 lines contain just 10 fields instead of 50, and also cuts down the size of the form within the formsfile as there are fewer fields that require start/end delimiters. The only overhead is within the program as the definition for each line must now contain the spaces between each data item.
It has been known that the amount of data available for each entity is too large to fit onto a single 80-column line on the screen. One way around this problem would be to take up two lines for each entity, but this would cut in half the number of entities that could be shown on a single screen.
Another option would be to stick to the single line per entity and split the amount of data to be displayed for each entity into two or more sets. By providing the user with a special function key he can then "toggle" between the different sets of data. By changing the column headings from hard-coded text on the form into a data field it would then be possible for the program to change the headings to suit the data being displayed.
When the program reads the data for each entity it should load it into an intermediate storage area and not directly into the screen buffer. There should then be a separate section to transfer each different set of data from this intermediate area into the screen buffer depending on the setting of the "toggle" switch.
As it is only possible to display one screenfull of data at a time it is usual practice to supply function keys which allow the user to move forwards to the next page or backwards to the previous page. This is easily done when reading from an IMAGE detail dataset as it is possible to read both forward and backwards, and to reposition at any record within the chain.
Various methods have been used to implement the paging functions, but the most successful one follows these lines:
%DBGET4) to the address of the last record on the current screen.%DBGET5).%DBGET6).Where an input/update function has room for an array of entities on the screen it can be quite complicated to allow the user to access the whole of the array to add, amend or delete different records. One very versatile method is to make the bulk of the array into display-only fields (similar to the enquiry function in the previous section) and to restrict all modifications to the last line on the screen (known as the "action" line).
Two additional fields will be normally be required on this "action" line - one to identify the record to be manipulated, and another to identify the mode (Add, Change or Delete).
This means that only one record at a time can me manipulated, but the display-only block above the "action" line would have room to show the details of other records, with function key options to load the previous or next page of records as in the enquiry function.
The program code to handle each action mode would be as follows:
| Add | Validate for a new record, add to database, transfer details to next available blank line in the display area, or scroll the existing details up to make room on the last display line. |
| Update | Load details of the selected record into the action line, allow the user to make amendments, then overwrite details in the screen area with the new values. |
| Delete | Load details of the selected record into the action line, and if confirmed delete the record from the database and blank out the corresponding line in the display area. |
It would be necessary to store the IMAGE record addresses for all the records in the current screen, as well as the first and last records, as the Update and Delete procedures would be required to re-read the selected records (using %DBGET4) before they could be updated or deleted.
If either of the first/last records in the current screen were deleted the stored record addresses used for the next/previous page functions would have to be modified to reflect the actual first/last records after the deletion has taken place, otherwise the %DBGET4 would be given a record address that does not exist, and would cause the program to abort.
- END -