In an earlier article, 'Generating dynamic web pages using XSL and XML', I showed the XSL code that I have created in order to transform XML documents, which I create dynamically, into HTML documents for output to a web browser. This is a standard method of generating web pages that is supported by the World Wide Web Consortium and which gained popularity with the Apache Cocoon Project. In this article I will show you the XSL stylesheet that I use to transform XML data into a tree view.
A tree view shows nodes in a tree structure, like the file explorer on your PC. This starts with one or more root nodes at the first level (level 1), and for each node it will show if child nodes exist at the next level (level 2) going all the way down the structure to the lowest level. Rather than showing the whole structure down to the lowest level in one go it is common practice, as with the file explorer on your PC, not to show any child nodes unless specifically requested. Each node that has children will have one of the following buttons next to it:
Note that this button has a toggle effect, which means that once it has been pressed and the task has been completed it will switch to indicate the opposite task.
A node's children are incuded in the display immediately following it, and they are also indented by one unit in order to better signify the parent/child relationship. Those nodes which exist at level 2 or lower will also have a ![]() sign which helps to indicate their parent node.
sign which helps to indicate their parent node.
If a node does not have any children then a blank space will be shown instead of a 'collapse/expand' button.
Note that the following screen shots also contain buttons labelled EXPAND and COLLAPSE at the bottom of the display. These will cause the entire tree structure to be expanded or collapsed in one go.
The following web pages were created using the PHP scripting language talking to a MySQL database running under the Apache web server. Samples of the .xsl and .xml files used in this article can be downloaded here (tree-view.zip 12KB)
Figure 1 - the root node collapsed
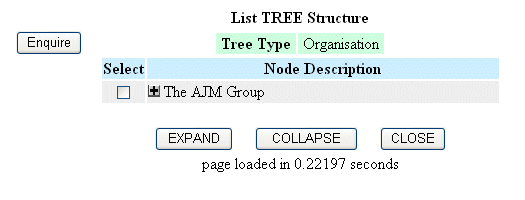
Figure 1 shows the initial display for a tree view which contains only those nodes that exist at the first level. In this example there is only one root node, but there could be more.
Figure 2 - expanded to level 2
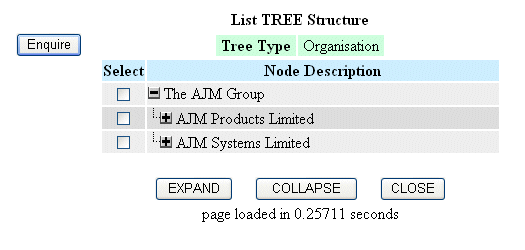
Figure 2 shows the result of pressing the 'expand' button on Figure 1. The 'expand' button switched to 'collapse', and the node's children are included in the display. As these nodes have children of their own, but which are not yet included in the display, they will each show their own 'expand' button.
Figure 3 - expanded to level 3
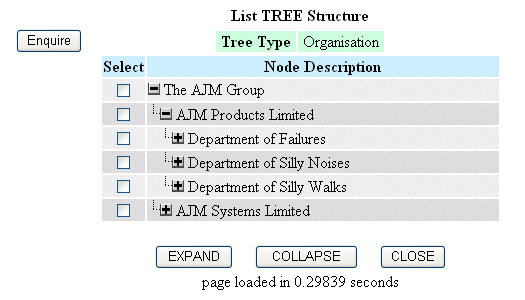
Figure 3 shows the result of pressing the 'expand' button for one of the child nodes on Figure 2. Its three children are now shown, and because each of these nodes have children of their own they also will have an 'expand' button. Note how each sucessive level has been indented.
Figure 4 - expanded to level 4
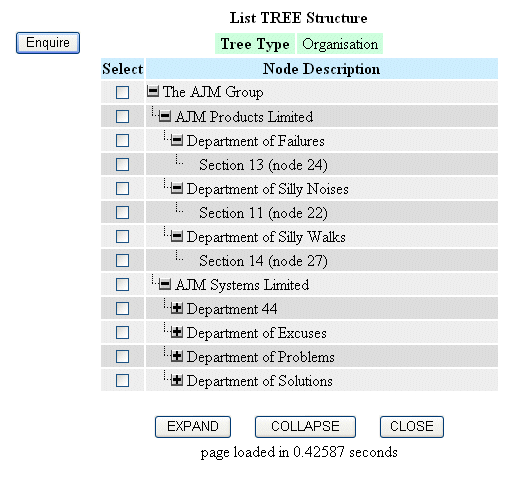
Figure 4 shows the result of pressing the 'expand' button for each of the new child nodes on Figure 3. Note that none of the new nodes have children, so a blank space is shown instead of an 'expand' or 'collapse' button.
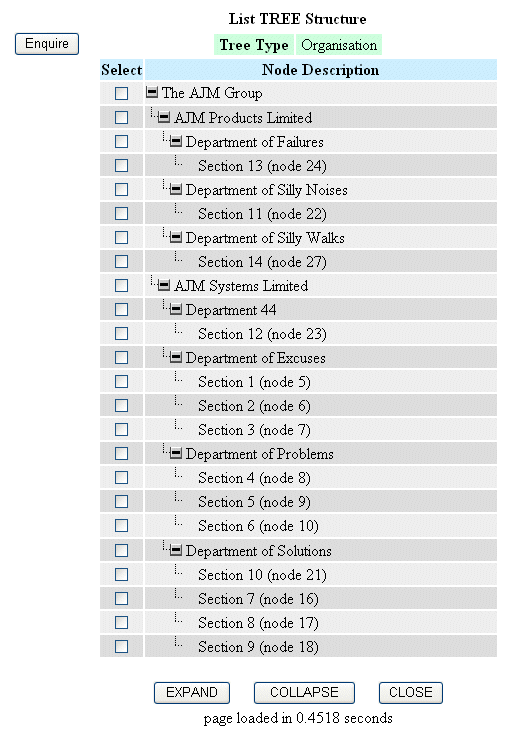
Figure 5 shows the entire tree structure after pressing the 'expand' button for each and every node, or by pressing the global EXPAND button at the botton of the screen.
The transformation process requires an XML file to provide the data and an XSL file to define the transformation rules.
This is an extract of the XML file that was used to create the HTML document shown in Figure 2.
<?xml version="1.0"?>
<tree_node_jnr.xample>
  <tree_type> (1)
    <tree_type_id>ORG</tree_type_id>
    <tree_type_desc>Organisation</tree_type_desc>
    <tree_node_jnr> (2)
      <node_id>25</node_id>
      <tree_type_id>ORG</tree_type_id>
      <node_desc>The AJM Group</node_desc>
      <tree_level_seq>1</tree_level_seq>
      <child_count>2</child_count>
      <expanded>y</expanded>
    </tree_node_jnr>
    <tree_node_jnr> (2)
      <node_id>26</node_id>
      <tree_type_id>ORG</tree_type_id>
      <node_desc>AJM Products Limited</node_desc>
      <tree_level_seq>2</tree_level_seq>
      <child_count>3</child_count>
    </tree_node_jnr>
    <tree_node_jnr> (2)
      <node_id>1</node_id>
      <tree_type_id>ORG</tree_type_id>
      <node_desc>AJM Systems Limited</node_desc>
      <tree_level_seq>2</tree_level_seq>
      <child_count>4</child_count>
    </tree_node_jnr>
  </tree_type>
  <navbar> (3)
    <button id="tree_node_enq.php">Enquire</button>
  </navbar>
  <actbar> (4)
    <button id="expand">EXPAND</button>
    <button id="collapse">COLLAPSE</button>
    <button id="close">CLOSE</button>
  </actbar>
</tree_node_jnr.xample>
Here is the description of the numbered items:
ID="..." attribute identifies the value that will be passed in the POST array when the button is pressed.This is an extract of the XSL file that was used to transform the previous XML data into the HTML document shown in Figure 2.
<?xml version='1.0'?>
<xsl:stylesheet xmlns:xsl="http://www.w3.org/1999/XSL/Transform" version="1.0">

<xsl:output method='html'/>

<!-- param values may be changed during the XSL Transformation --> (1)
<xsl:param name="title">title</xsl:param>
<xsl:param name="script">unknown</xsl:param>
<xsl:param name="orderby"></xsl:param>
<xsl:param name="order"></xsl:param>
<xsl:param name="numrows">0</xsl:param>
<xsl:param name="curpage">1</xsl:param>
<xsl:param name="lastpage">1</xsl:param>
<xsl:param name="script_time">0.0</xsl:param>

<!-- include common templates --> (2)
<xsl:include href="std.head.xsl"/>
<xsl:include href="std.navbar.xsl"/>
<xsl:include href="std.actionbar.xsl"/>
<xsl:include href="std.selectbox.xsl"/>
<xsl:include href="std.message.xsl"/>
<xsl:include href="std.treenode.xsl"/>

<xsl:template match="/"> <!-- standard match to include all child elements -->

  <html xmlns="http://www.w3.org/1999/xhtml" xml:lang="en" lang="en">
    <xsl:call-template name="head" /> (3)
  <body>

  <form method="post" action="{$script}"> (4)
  <div class="center">

  <table border="0" class="outertable">
    <!-- the outer table has 3 cells - navbar+spacer+body -->
    <tr>
      <td></td>
      <td></td>
      <td class="caption"><xsl:value-of select="$title"/></td>
    </tr>
    <tr>
      <!-- create navigation buttons -->
      <xsl:call-template name="navbar" /> (5)

      <!-- this is a space between the navbar and body cells -->
      <td class="spacer"></td>

      <td class="body">

        <!-- This is the parent table -->
        <table border="0" class="parent">
          <tr class="outer">
            <xsl:for-each select="//tree_type[1]">
              <td class="outerlabel">Tree Type</td>
              <td class="outer">
                <xsl:value-of select="tree_type_desc"/>
              </td>
            </xsl:for-each>
          </tr>
        </table>

        <!-- this is the child table -->
        <table border="0" class="datatable">
          <colgroup align="center" />
          <colgroup width="350" />

        <thead>
          <tr>
            <!-- set up the column headings -->
            <th>Select</th>
            <th>Node Description</th>
          </tr>
        </thead>

        <tbody>
          <!-- add a table row for each inner record in the XML file -->
          <xsl:apply-templates select="//tree_type[1]/tree_node_jnr" /> (6)
        </tbody>

      </table>

      <!-- look for optional messages -->
      <xsl:call-template name="message"/> (7)

      <!-- create standard action buttons -->
      <xsl:call-template name="actbar"/> (8)

    </td>
  </tr>
</table>
</div>
</form>
</body>
</html>

</xsl:template>

<xsl:template match="tree_node_jnr"> (9)

  <!-- set the row class to 'odd' or 'even' to determine the colour -->
  <tr>
    <xsl:attribute name="class"> (10)
      <xsl:choose>
        <xsl:when test="position()mod 2">odd</xsl:when>
        <xsl:otherwise>even</xsl:otherwise>
      </xsl:choose>
    </xsl:attribute>

    <td>
      <!-- this cell contains the checkbox to make selections -->
      <xsl:call-template name="selectbox"/> (11)
    </td>

    <!-- these table cells contain the actual data -->
    <td>
      <xsl:call-template name="tree_node"> (12)
        <xsl:with-param name="id" select="node_id"/>
        <xsl:with-param name="desc" select="node_desc"/>
        <xsl:with-param name="depth" select="tree_level_seq"/>
        <xsl:with-param name="child_count" select="child_count"/>
        <xsl:with-param name="expanded" select="expanded"/>
      </xsl:call-template>
    </td>

  </tr>

</xsl:template>

</xsl:stylesheet>
Here is the description of the numbered items:
head which is contained in std.head.xsl.navbar which is contained in std.navbar.xsl.message which is contained in std.message.xsl.actbar which is contained in std.actionbar.xsl.</xsl:template> line.CLASS attribute of the TR tag accordingly. The properties of each CLASS are defined in a separate CSS file and identify which colour is to be used as the background for each row.selectbox which is contained in std.selectbox.xsl. This is placed in the first cell of each row.treenode which is contained in std.treenode.xsl. This will determine the contents of the row based on the values of the parameters which are passed to it.These are stylesheet templates that are defined in their own separate files, but then 'included' into other XSL files during the transformation process. In this way changes can be made to one template and instantly inherited throughout the entire system.
<?xml version='1.0'?>
<xsl:stylesheet xmlns:xsl="http://www.w3.org/1999/XSL/Transform" version="1.0">

<xsl:template name="tree_node"> (1)
  <xsl:param name="id"/>
  <xsl:param name="desc"/>
  <xsl:param name="depth"/>
  <xsl:param name="child_count"/>
  <xsl:param name="expanded"/>

  <!-- insert a bookmark -->
  <a name="{$id}"></a> (2)

  <xsl:call-template name="indent"> (3)
    <xsl:with-param name="depth" select="$depth"/>
  </xsl:call-template>

  <xsl:choose>
    <xsl:when test="$child_count > 0"> (4)
      <!-- insert button for 'expand' or 'collapse', as appropriate -->
      <xsl:choose>
        <xsl:when test="$expanded"> (5)
          <!-- item is expanded, so insert 'collapse' button -->
          <a href="{$script}?collapse={$id}#{$id}">
            <img src="images/minus.gif" height="12" width="12" alt="Collapse Thread" />
          </a>
        </xsl:when>
        <xsl:otherwise> (6)
          <!-- item is collapsed, so insert 'expand' button -->
          <a href="{$script}?expand={$id}#{$id}">
            <img src="images/plus.gif" height="12" width="12" alt="Expand Thread" />
          </a>
        </xsl:otherwise>
      </xsl:choose>
    </xsl:when>
    <xsl:otherwise> (7)
      <!-- no children, so insert blank spacer -->
      <img src="images/spacer.gif" height="12" width="12" alt='' />
    </xsl:otherwise>
  </xsl:choose>

  <xsl:text> </xsl:text> (8)
  <xsl:value-of select="$desc" />

</xsl:template>

<xsl:template name="indent"> (9)
  <xsl:param name="depth"/>

  <!-- for each of $depth > 1 insert a spacer -->
  <xsl:if test="$depth > 1"> (10)

    <xsl:choose>
      <xsl:when test="$depth=2">
        <!-- insert angle symbol --> (11)
        <img src="images/angle.gif" height="16" width="12" alt='' />
      </xsl:when>
      <xsl:otherwise>
        <!-- insert spacer --> (12)
        <img src="images/spacer.gif" height="12" width="12" alt='' />
      </xsl:otherwise>
    </xsl:choose>

    <!-- recursive call with $depth decremented -->
    <xsl:call-template name="indent"> (13)
      <xsl:with-param name="depth" select="$depth -1"/>
    </xsl:call-template>

  </xsl:if>

</xsl:template>

</xsl:stylesheet>
Here is the description of the numbered items:
indent which is defined as item (9).indent which is called from item (3).$depth decreases to less than 1 as this point is reserved for the 'collapse' or 'expand' button.$depth each time.I have heard it said by several so-called 'experts' that you cannot have tree structures in an HTML document without using javascript. Not only are they wrong, but because it can be done in HTML it can also be done using a combination of XML and XSL. XSL is not a 'flimsy' or 'immature' scripting language as some people would lead you to believe, as whatever HTML code you can produce from your favourite scripting language you can also produce from XSL stylesheets.
Samples of the .xsl and .xml files used in this article can be downloaded here (tree-view.zip 12KB).
I have written another article at A Flexible Tree Structure which gives access to a sample application written in PHP/MySQL/XML/XSL. This contains all the necessary functions to build and view a Tree structure. This sample application can be run online from my website, and you can also download all the source code to run it within your own environment.
| 26th August 2004 | Updated the Summary section to add a link to a new document entitled A Flexible Tree Structure which gives access to an online demonstration with downloadable code. |